Elyra: Part 1 – Optimal Tokenization

TL; DR, I aimed to shoot Lua but sniped Google instead.

Making A Weapon Language To Surpass Metal Gear Lua Script

I’m reviving my toy language Elyra, because I recently had the thought that I wanted something better than Lua to integrate into game engines without the pains of JavaScript or Python integration. I also wanted to delve more into learning about compilation techniques and optimization, and this scratched that itch.

Having read the original Lua developer paper on the implementation of Lua 5.0, I understand exactly where they’re coming from in the 2003 computing perspective. Unfortunately, we are far closer to 2033 than 2003, and compiler theory has definitely evolved. Fortunately, if I want to match the performance of Lua’s compiler, this gives me a lot of headroom for more features or optimizations.

So how I am approaching the problem starts with some basic logic. In most normal programs, you have the axes of throughput and latency. Throughput is how much calculations can you do in a time frame, and latency is how much time it takes to get a result. Sometimes you can make optimizations that increase throughput and decrease latency, which is generally alluded to as “efficiency”. But often times getting to one extreme or the other sacrifices the other.

If you are a high frequency trader, it doesn’t matter if the code is doing the most throughput of transactions, it matters that your transaction is hitting the network in microseconds, otherwise you lose the trade and lose money. On the opposite, you don’t care how long it takes to submit a queue to a super computer, you just care that it does all the operations you requested in your simulation of the matrix when it hits the compute cluster as fast as possible; the time from submit to starting the computation is probably irrelevant to the customer unless that latency becomes so absurd that it is a measurable percentage of the time for the calculation.

However, in a compiler and JIT, the speed of getting from source to the first line executing is defined as the latency, but this is bound by the throughput itself. You need to get all of your code compiled and into the JIT as fast as possible, which implies that you process the code as fast as possible. In this sense, the axes are aligned. I want Elyra to be an Ahead of Time (AoT) compiled language as it allows caching and other transformations, while still being fast enough to be able to be compiled directly at runtime.

A compiler is a simple pipeline:

  • Source Code goes into the Tokenizer, becomes Tokens
  • Tokens go into the Parser, becomes a Parse Tree (or AST)
  • Parse Tree goes through Semantic Analyzer, becomes an IR
  • IR goes through optimizer and code generator, becomes Machine Code

Every stage then must take as little time as possible, and winning in each compounds throughout the program, which means the highest throughput possible. How can we achieve that?

Data Oriented Design

Of course I’ve seen Mike Acton’s Data Oriented Design talk at CPPCon 2014 online, and I was introduced to the concept by Zig’s BDFL and Creator Andrew Kelley and his talk at Handmade Seattle. I was also present for a similar talk by Matthew Lugg at Software You Can Love Milan 2024 in the theatre (with no air conditioning during summer, mind you).

Data Oriented Design is the focus on viewing programming as a means of shuffling and transforming data while also understanding and using the realities of computer caches, pipelines, and low-level CPU design and hardware to generate optimal code.

Before we get started… What is our target goal? It’s always useful to set targets.

Chandler Carruth, developer of the Carbon Language, set his goals as 10M Lines of Code tokenized and parsed, 1M Lines of Code semantic analyzed and lowered to IR, and 100K Lines of Code output via LLVM to machine code. These are measured as lines of code per second per core. (In the context of Chandler’s talk, this is an aspirational goal, not a hard deadline and depends on hardware)

If it’s good enough for Google, it’s good enough for me.

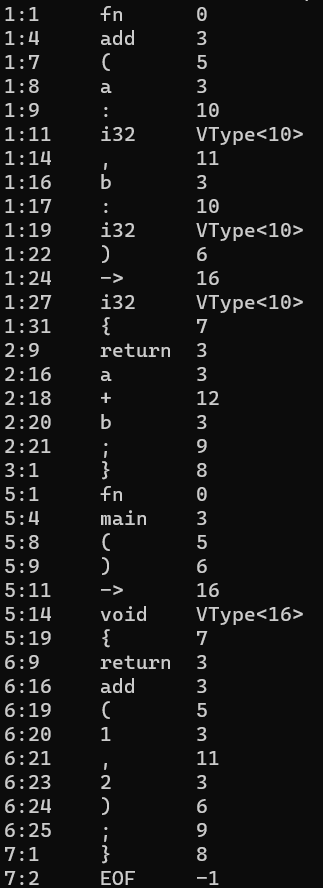
Quick example of what Elyra will look like:

# Function declaration
let add = func(a: i32, b: i32) -> i32 {
    return a + b;
}

# Partial function application
let add5 = add(5);

# Trait definition
let MyTrait = trait {
    sum: i32,

    printSum: func() -> {
        # Some placeholder exposed by VM
        builtin.print(printSum)
    }
};

# Structure with trait
let MyStruct = struct (MyTrait) {};

var instance = MyStruct {
    .sum = 0,
};

# 8
instance.sum = add5(3);
instance.printSum();

How Lua Tokenizes

First, let’s define what a Token even is. A token is just a string or character with syntactical meaning. Think of a ; , keyword , or an identifier like foo. Tokenization or lexing then, is the breakdown of source code into tokens.

Lua defines a token (from llex.h on current development branch) as:

typedef union {
  lua_Number r;
  lua_Integer i;
  TString *ts;
} SemInfo;  /* semantics information */

typedef struct Token {
  int token;
  SemInfo seminfo;
} Token;

If this code isn’t sinful then I don’t know what is. Basic compiler struct layout logic applies here: int is usually 32-bits, even on a 64-bit compiler. SemInfo is a union, and each member of this could be 32 or 64 bits. In the case that it’s 64 bits, we now have a struct whose alignment is 64 bits, and therefore that int entirely loses us 32 bits to padding in the struct. Let’s also mention that the number of defined token types will never saturate 32 bits.

Another issue lies with the inclusion of the SemInfo union; Is it even necessary to package this with every single Token? For example, there’s no data stored by TK_AND (the word and) because you already know what it is; it cannot store any other information.

Lua was created in a time during the late 90s and early 2000s that the word “locality” in the existing compiler literature usually meant locality in the source file reading from disk to the final result. This was pragmatic because you didn’t have that much memory to store your tokens or tree in and it was better to reclaim as much as possible. This can also be called the lazy model of the compiler.

While pragmatic for the time, this is definitely obvious in luaX_next, which is a token streaming function. The parser will take a token from a buffered context and immediately consume it. By default this would be a file. This destroys any locality of reference and likely results in a lot of inefficient use of the L1 cache when doing parsing.

I wrote a quick micro benchmark on Lua from the master branch in C++ running on 8MB of Lua Source generate via python. I gave it a couple advantages working with the internal API such as loading all of the memory of the file at once, and not doing parsing, just tokenization, which is obviously way better on L1 cache. I added the values to a pre-allocated std::vector<Token> (to not have alloc get called) to simulate storing the tokens in the hot loop, to make my comparison like-for-like. (I’m really trying to give it the best chance!)

Lua sets a solid baseline here at 41.3 Million tokens per second, 9.1 Million lines of code per second, with a throughput of 146.5 MB/s of source input. Remember though that the goal was tokenize and parse at 10 Million lines of code per second per core.

Benchmark was ran on an AMD Ryzen 9 9950X with 64GB of 6000MT/s CL 36 RAM on Ubuntu 24.04. This single-core benchmark gets the benefit of the full max 1 core boost clock.

Starting the Tokenizer

I’m going to write my compiler and JIT in Zig as it has trivial compilation to C for extended platform support, and is also a great experience as a better-than-C C. Buy more stocks of $ZIG, now!

Another noteworthy exemption here is that I want the code to be roughly cross-platform, so I don’t want to tap into AVX or SIMD explicitly. If the compiler does it for me, I’ll take it, but if it doesn’t, then I won’t be that bothered. Additionally I don’t want to use any CPU-specific instructions or derivatives like ctz and clz. The most will be optimizer hints like @branchHint or indicating that a variable should be @prefetch in a certain context, which are both nop if not supported.

I made a simple container for the program code and file name per compilation unit / module called SourceObject

const SourceObject = struct {
    text: []const u8,
    filename: []const u8,
    allocator: std.mem.Allocator,

    // functions to load from file, memory
};

This code didn’t really provide me anything more than reaffirming the marketing on my Samsung NVME Drive was indeed correct.

Let’s consider all the things a Tokenizer or Lexer does; First and most obviously it looks at the current character or set of characters and transforms that into a token. For example it sees != and translates that into Token.NotEquals. It also needs some way of storing where the token is, like the line number and column — if there’s a parsing error, I want to look up where the token is and print it. Additionally, now is probably a good time to store the pointer to where we are in source code. And we should also take literals like strings, numbers, and even identifiers, and store those. Maybe we should even encode length

So we have the following variables:

  • Kind
  • Position
  • Source Location
  • Literals / Identifiers

A naive tokenizer would simply use a struct approximating something like this:

const Token = struct {
    position: *u8,
    kind: TokenEnum,
    line: u32,
    column: u32,
    literal: union (Tag) {
        Identifier: IdentStruct,
        Float: f64,
        Int: u64,
        String: []const u8
    }
};

This is an abomination, it takes up a huge number of bytes, 38, or 40 with padding. What if I told you we could encode that in 4 bytes?

Efficient Token Packing

First, drop the line and column — the source location already tells you that — you just go from the start of the source and count your \ns and then how many characters you just moved forward. It’s also trivially cheap to just add a secondary auxiliary buffer containing the token positions of the last line break as an index into the token array, such that you can do a linear search on that array of the count of positions before yours, then calculate the column value if it becomes necessary to support that.

Second, the source location shouldn’t be a full pointer — you will not be loading 256 TB of source code in my language (nor 4GB for that matter). The whitespace can be packaged into influencing the kind enum. This doesn’t need to be explicitly packed in.

Finally, as for literals, we can do an optimization called interning — where we turn everything into integers, and store these in a secondary array. This can technically be multiple arrays, what matters is that we know that this will be sparsely populated compared to the raw number of simple tokens like (,{.}+-/*. Often times, we don’t even need to really reference this array, so it’s going to be in the slow path anyways, while the tokens need to be in the hot path.

What we’ll do is maintain a secondary list of this data corresponded to token identifiers. For example:

// Two 32-bit values, first is token index
// second is valMap index
var tokenValMap: []u64 = 0;

// These are either f64 or u64 and are de-duplicated
var valMap: []u64 = 0;

for (tokens, 0..) |t, i| {
    if (t.kind == .Float) {
        var fval = for (tokenValMap) |pairs| {
            if (pairs >> 32 == i) 
                break valMap[pairs & 0xFFFF_FFFF];
        } else @panic("Not found!");
    }
}

The same can be done with strings as well, for even greater cost savings.

So what does my proposed hyper-optimized token look like?

const Token = packed struct (u32) {
    kind: u8,
    position: u24,
};

Of course, now we also have a few extra arrays that we keep around too which will be covered later. Zig will automatically shift / mask for us, and with the way we’re indexing, this should be fine.

Setting the Baseline

Let’s do the most trivial tokenizer ever!

var i: u24 = 0;
while (text_ptr < text_end) : ({text_ptr += 1; i += 1}) {
    try tokens.append(.{
        .kind = text_ptr[0],
        .position = i,
    });
}

This is effectively a spicy memcpy. I created a script in Python to generate valid-ish looking Elyra code.

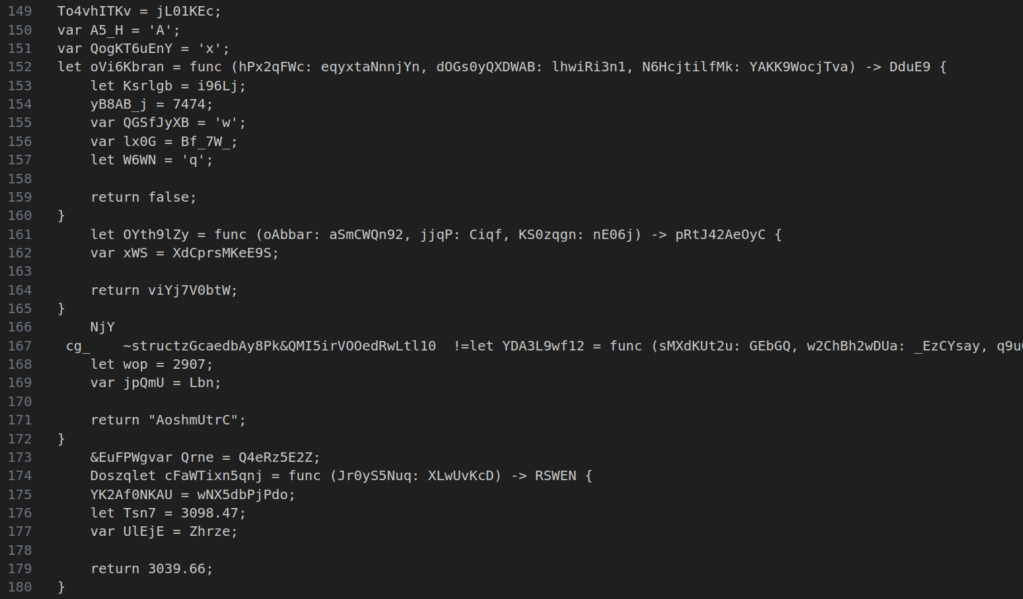
We can run it and see some decent results.

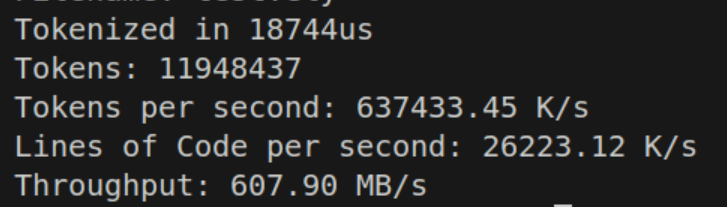
26 million lines of code per second sounds impressive, and so is 637 million tokens per second. But if you’re seeing that throughput number, we’re somehow nearly 10 times slower than my NVME disk on memcpy? If this is the best we can do, what are we even fighting for?

But of course there’s a few things we need to look at in the current implementation. In try tokens.append there are two branches, one obvious and one implicit. The obvious branch is the error case of it trying to allocate more memory and failing. The compiler already marks this as a cold path, so we probably don’t feel it.

The more pressing matter is the internal logic of append(). Thankfully, the Zig Standard Library Source is far more readable than something like C++. We can easily find ArrayList(T).append() here. Through multiple function calls that get inlined, it pretty much boils down to a simple dynamic array:

if (self.items.len == self.capacity) {
    self.capacity *= 2;
    // Realloc
}

const idx = self.items.len;
self.items.len += 1
self.items[idx] = value; 

Now that if might be expensive if we’re getting our buffer resized frequently, and adding a bunch of latency each time with a realloc. So there’s two strategies here. The more practical one is to start high with some heuristic based on data. You might notice that per X number of source input bytes you get a ratio Y number of tokens. This could be exploited to minimize the chances of hitting the bad side of the if, training the branch predictor to guess correctly. It also reduces the number of allocations necessary along some curve, and syscalls are expensive. For example, we can initialize our token array like so with a preallocation:

var tokens = try std.ArrayList(Token).initCapacity(
    allocator, 
    source.text.len / 2,
);

This results in a pretty massive speedup to about double the speed. Also we can get rid of any excess by doing tokens.shrinkAndFree() at the end, bringing the buffer back into the right size.

Still at this point, I’m not satisfied. If we’re gonna hit this heuristic hurdle, we might as well just preallocate the entire thing. And we get another bump

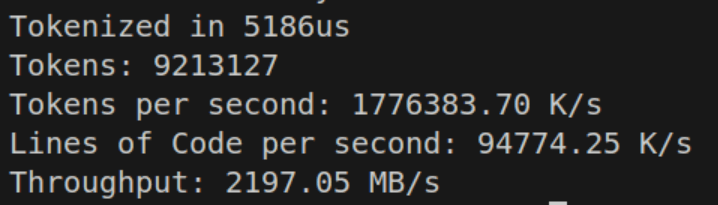
But if we preallocated everything, we could also remove the if check entirely, and in fact, even the try. If we use tokens.appendAssumeCapacity() we can get blazingly fast.

That’s obviously crazy fast! But the one issue you might run into is going to be RAM usage. Tokenizing a file temporarily will spike your memory usage by @sizeOf(Token) * source.len before settling back down from the shrink. In the context of Elyra, where I’m expecting the amount of code to be at worst probably 1MB, this is probably fine. I will continue comparing this with the “slow” implementation will also include a heuristic memory pre-allocation of source.len / 4. This probably can be improved with a real dataset of real code.

Skipping Whitespace

In our application, we don’t care about whitespace when we come across it outside of possibly unary / binary deduction logic. Thus we can implement skipping. One might think that the easiest thing to do then is just a simple if, or even a switch statement.

while(text_ptr < text_end) : (text_ptr += 1) {

    if (text_ptr[0] is a whitespace) 
       continue;
}

And we see our throughput crash as a result:

But can we do better? Well maybe a switch?

Margin of error.

But how can we possibly do this any faster? The answer is branchless programming. Fundamentally, we want to kind of calculate both sides of the branch — the case where we do something, and the case where we don’t. This way we can mathematically deduce the answer without a branch, and as we’ve seen, branches are expensive.

In this case, we actually need to simulate the case we do something and the case where we don’t do something to the array list. Basically then, I want to “delete” an entry off the array list if it’s a space, and the entry is garbage, or I want to add an entry. So we can figure out how to do this by doing each boolean condition and then multiplying right?

const is_space = text_ptr[0] == ' ' or text_ptr[0] == '\n'
append(&tokens, tk);
token.items.len -= 1 * is_space;

Huh? How did we get the same performance? In every single case, we’ve just basically done the exact same set of operations and rendered down to the same machine code. So is that it?

Well let’s try a slightly smarter tactic. We can do all of the checks in one operation. To do this, we construct a mask (or a set of masks) and then shift the bits over and check.

const space_mask = [_]u32 {1 << '\t' | 1 << '\n' | 1 << 'r', 1 << (' ' - 32), 0, 0}
const is_space = space_mask[c >> 5 & 3] >> @truncate(c) & 1;

What we’ve basically done is made a mask of the ASCII values we care about on the bit offsets, then we shift over by the number of bits to grab and we end up getting whether or not we are a space character or not.

And this time, we see that the performance impact is much lower! So why does this work? Shouldn’t at least the other branchless example have compiled down similarly?

Using Godbolt, here is the compiled code:

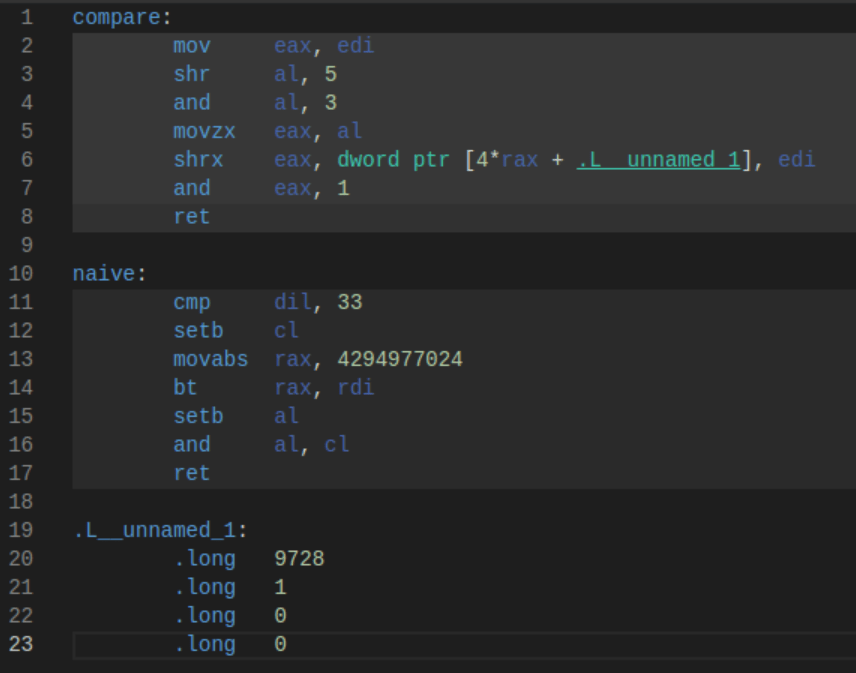
So why is compare (the masked version) so much faster? The answer lies in the operations themselves. In the naive version, cmp is a slow operation and it introduces a subtle flag dependency. The CPU pipeline must let the flag get set. movabs is also a relatively slow operation, and the setb is used to do a set bit operation. If you’re wondering if removing 33, the space character, helps, it still runs only about 20% better, and now we have semantically incorrect code.

Compare that to the masked version, which simply does 4 bitwise operations and a move, the fastest instructions your CPU can do. In fact, the CPU likely pipelines these in such a way that all of them run at almost the same time.

Of course littering our code with these masks might be rather annoying, so Zig allows us to just create the masks with a generalized function at compile time and then use them. We can also force the check itself to be inlined, and we now have a very clean way of writing our branch mask sets. The use of u32 is to help the lower-end systems being targeted.

As for why our code is now slower than the empty example, this actually has to do with data dependency. Because the previous sample had no data dependency, items.len predictably grew by only one, we could pre-compute and add every token without caring if the previous was done yet, because it affected nothing. Now that items.len is less able to be predicted, we cannot get that same pipelining benefit. Unfortunately, this isn’t a case where a two-pass prefix sum (or three passes) will make things better, as I’ve tried and not found any success; the compiler can make even less assumptions about the indices being in any particular order. When do we get [[assume]] in Zig? /s (I’m not fully sure C++ [[assume]] is capable of using this hint, as a lot of assumptions passed into the C++ optimizer don’t do what you expect)

Identity Mapped Tokens

Because our tokens including single-character tokens, we can simply map these as the same value in our TokenKind enumeration. If we want to scan for the identity mapped tokens, we must also exclude potentially multi-character tokens like + % != and others. With our create_ascii_mask_array ‘macro’ we can auto generate the mask at compile time. And simply use it a parameter in append.

The performance isn’t terrible here, but we still notice a drop-off. This appears to be because the hot-loop is now generating a cmov for the .kind parameter. Beforehand it could simply just mov the value of c.

But if we want to Go Nowhere Faster, we have to check if doing a branch here is actually faster; in some cases, the branch predictor is faster than cmov Now those cases usually require the condition be predictable. The branch predictor is not our friend in tokenization as the input may as well be random.

And we find that doing an if expression does lower the throughput, though not by as much as you might suspect.

Now that we’ve started producing actual valid tokens, I thought it was about due time to also create some tests, to check my expected results. I also introduced Tracy, a real time, nanosecond-accurate tracing telemetry-based profiler. I seriously recommend using Tracy if you’re doing game development (frame & API profiling) or other compute-intensive tasks. Tracy integrates well with allocators for memory diagnostics as well.

Structural Change

Adding more and more cases to this while loop began seriously dragging my performance, to the point where I only ran on-par with my previous simple switch-case, which fell quite short of where I wanted to be. I however wondered if my switch case was failing to be optimized. So while running a ChatGPT-4.5 Deep Research query for fun on Lexer Designs, it came across this comment in Carbon’s Lexer.

Even in the early days of LuaJIT, the developers were running into the same problem where the C optimizer would never really hit the same level of the parallel case, but instead hit diamond-shape control-flow, and immediately have issues. This issue has seemingly remained the case in C, C++, Zig, and every other LLVM-language (citation needed).

So the solution? Tail calls, and a dispatcher table. This model shifts from a general loop that handles all possible conditions to many smaller functions that handle a specific condition. It’s easy to see how this could be faster. When you have a tail call, the compiler emits a single jump to your next function, resulting in no overhead bookkeeping of the stack, and this results in some nice performance gains, as we can do less work. This also lets the optimizer do more with the functions we’re returning.

But as with all things, measure!

I wrote 3 implementations, one with a naive switch, one with a labeled switch-continue dispatch table, and another with a good ol’ array dispatch table. These handled single character and multi-character tokens.

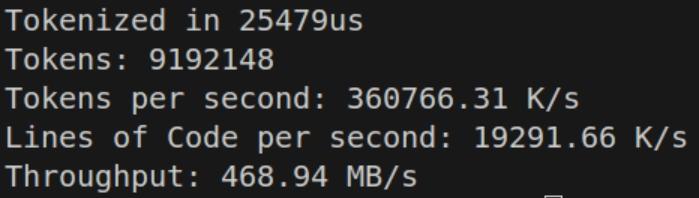
The labeled switch-continue performs respectably at 468.94 MB/s — on par with the purely tail-call optimized dispatch table.

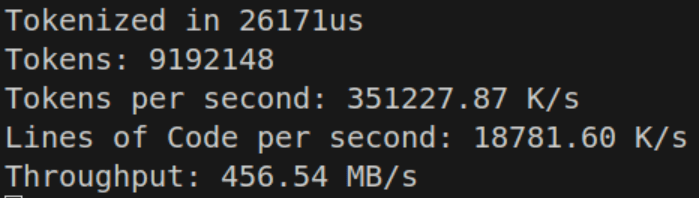
However the while-switch statement seems to perform just a bit better than the competition.

This might be because loop-unrolling is allowed to happen, or cross-branch switch optimizations occur. These don’t seem to be all that fast; maybe I can do a different structure using pre-calculated character tables.

The Weird

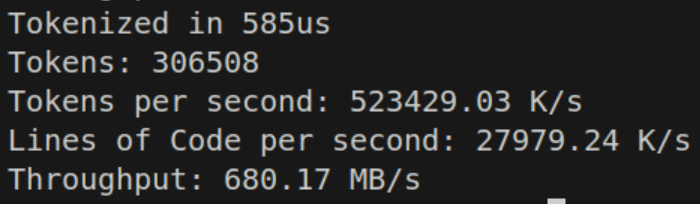
An if-else block seems to absolutely dominate the competition. It’s sorted by likelihood, and just works. It seems that sequential comparisons are actually beating a jump table in terms of branch prediction, or at minimum — they’re not worse. The benefit of a jump table is somewhat nullified if the CPU can’t utilize speculative execution, even if that execution isn’t always perfect. By moving the heuristic cases of the if statement around and some other tricks, the good-ol’ if statement is able to beat a dispatch table or switch case jump table. Using perf stat, branch predict misses went from ~10% down to 5%.

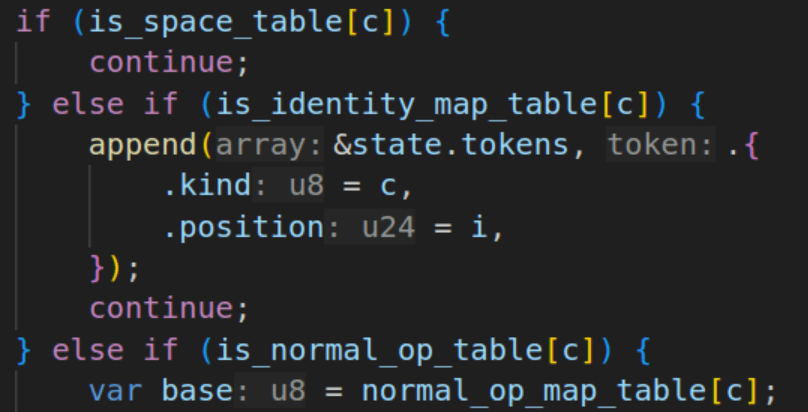
To actually do this in a way that is fast, I don’t just simply do a comparison like before if c == ' ' or c == '\n' ... Instead we precompute a u8 lookup table for all the different cases, and just look up the case. In this case, trying to do the mask seems to perform slower than just looking up the table, so the earlier solution is abandoned for now. If there are special starting values the base value is pre-calculated and entered into the lookup table. In the normal op table this includes something like %, which is the remainder. The value for that is at the address in the table, and to turn into %=, simply add one if the next value is =. That comparison is simple enough for the compiler to optimize.

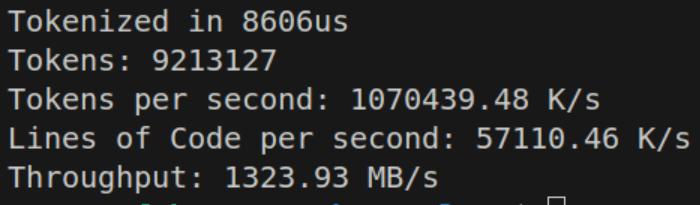
Complex operators like the +, -, * which all have wrapping, saturated, and set-equal variants required creating a DFA via switch statement, which appears to work fine on simple math. Adding the remainder of operators and logic, we actually improve performance up to ~850-900MB/s.

This is due to identifiers and multi-token characters reducing the total number of iterations of the loop, even though the loop becomes more expensive. We’re now finally amortizing some of our cost, which logically means we have a bit more wiggle room for performance.

This is actually where the cost of try append becomes somewhat equalized, with the heuristic len / 4, since the branch never gets called during runtime. I felt it okay at this point to no longer separate the memory limit code, and the performance is about the same, so sometimes you can have your cake (fast tokenize) and eat it too (low memory usage).

Keywords, Values, and Strings

For an identifier to be added, we must first determine whether it is an identifier or a keyword. If it is a keyword, we add the keyword value. Otherwise, we proceed with the identifier logic. For this, we just need a simple string lookup into a map. With Zig, we can optimize this at comptime with StaticStringMap.

Which is then declared as const kmap = KeywordMap.initComptime(KeywordPairs); Which can be used with an identifier to designate that the identifier is a keyword by simply calling kmap.get(identifier_slice). This is reasonably fast, and keeps us at about 600-650 MB/s. It’s worth noting that the testing code is VERY dense in identifiers.

Additionally I found myself wanting or needing to parse user data at a reasonable speed. At first I had planned to create an identifier table and string table which were both interned. I also wanted to handle integral and floating point values.

The issue I had with identifiers and strings was that it was simply easy to recall the values (go to token position, read until end), and trying to do set operations / hashing was destroying my loop performance. So I decided that it would be best to first identify all identifiers and then either recall as needed, or more likely, to perform string interning during the semantic analysis phase instead of now (pay the cost later). This is because the cost of string interning may be relatively high and the computer does not need it for the time being. Value interning though… is pretty cheap, in fact we can even store copies of the values — it just doesn’t matter.

With that decision out of the way, it became trivial to implement a lookup system — all I needed was token ID as a u32 and the corresponding index to look up. The token itself could be used to determine which table to lookup into. Simply search the array, find the token, return the index. The consumer takes the index and looks into the relevant side table for data. This is what was chosen for the Value table, which holds up to 64 bit integer and floating point data.

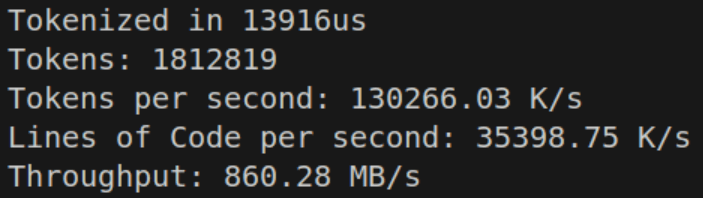
This along with the parsing logic for values cost a bit more, but only brings us down to ~600MB/s… and our tokenizer was… surprisingly complete. I know I skimmed the multi-character tokens a bit, and there’s certainly a few more optimizations I want to retry, but one goal of any personal engineering project that is unique to personal projects is the need to finish something.

Benchmarking & Comparison

Benchmark speeds were based upon the format the Google Carbon’s benchmarks used as I found them to be clear and easy to make head to head comparisons with.

Elyra (main branch)

Ryzen 9 9950X CL36-DDR5-6000

Total LinesTimeByte/sLine/sToken/s
2566us1091.54M41.08M162.70M
102416us1583.39M62.60M248.24M
4096127us792.58M32.09M122.85M
16384677us593.50M24.19M92.39M
655362763us582.75M23.71M90.67M
26214411003us587.13M23.82M91.02M

Macbook Air M4 10C8G Unified Memory

Total LinesTimeByte/sLine/sToken/s
2567us1078.30M34.83M162.98M
102426us1148.23M38.57M181.80M
4096120us998.52M33.91M155.35M
16384671us721.54M24.39M111.78M
655363001us644.41M21.83M100.29M
26214412383us625.82M21.17M97.37M

Lua (main branch)

Ryzen 9 9950X CL36-DDR5-6000

Total LinesTimeByte/sLine/sToken/s
25623.81us211.77M12.20M58.76M
102471.59us254.23M15.48M71.48M
4096308.77us223.48M13.90M63.00M
163841277us212.99M13.25M60.17M
655366995us150.35M9.38M42.42M
26214429578us142.24M8.86M40.14M

Macbook Air M4 10C8G Unified Memory

Total LinesTimeByte/sLine/sToken/s
25622us132.85M8.24M37.04M
102468us185.82M11.61M52.75M
4096377us191.23M11.91M53.91M
163841132us193.03M12.06M54.45M
655365510us179.69M11.21M50.64M
26214424509us169.97M10.59M47.96M

Carbon (main branch)

Ryzen 9 9950X CL36-DDR5-6000

Total LinesTimeByte/sLine/sToken/s
25616us327.93M12.14M68.55M
102462us517.00M15.58M91.53M
4096246us574.63M16.31M96.63M
163841043us585.54M15.63M92.77M
655364390us575.15M14.91M88.54M
26214421133us483.65M12.41M73.65M

Macbook Air M4 10C8G Unified Memory

Total LinesTimeByte/sLine/sToken/s
25625us208.44M7.72M43.57M
102482us395.21M11.91M69.97M
4096568us249.66M7.09M41.98M
163841515us403.09M10.76M63.86M
655365292us476.98M12.37M73.43M
26214422191us460.52M11.81M70.13M

Zig (0.14)

Ryzen 9 9950X CL36-DDR5-6000

Total LinesTimeByte/sLine/sToken/s
25613us583.72M18.44M191.76M
102461us511.34M16.61M167.04M
4096271us468.34M15.08M152.53M
163841154us440.78M14.19M143.64M
655364789us424.43M13.68M138.12M
26214420854us389.63M12.57M126.77M

Macbook Air M4 10C8G Unified Memory

Total LinesTimeByte/sLine/sToken/s
25612us654.02M20.66M214.86M
102452us595.69M19.34M194.60M
4096227us559.73M18.02M182.99M
16384969us524.88M16.90M171.04M
655363996us508.71M16.40M165.55M
26214416248us500.06M16.13M162.71M

Discussion

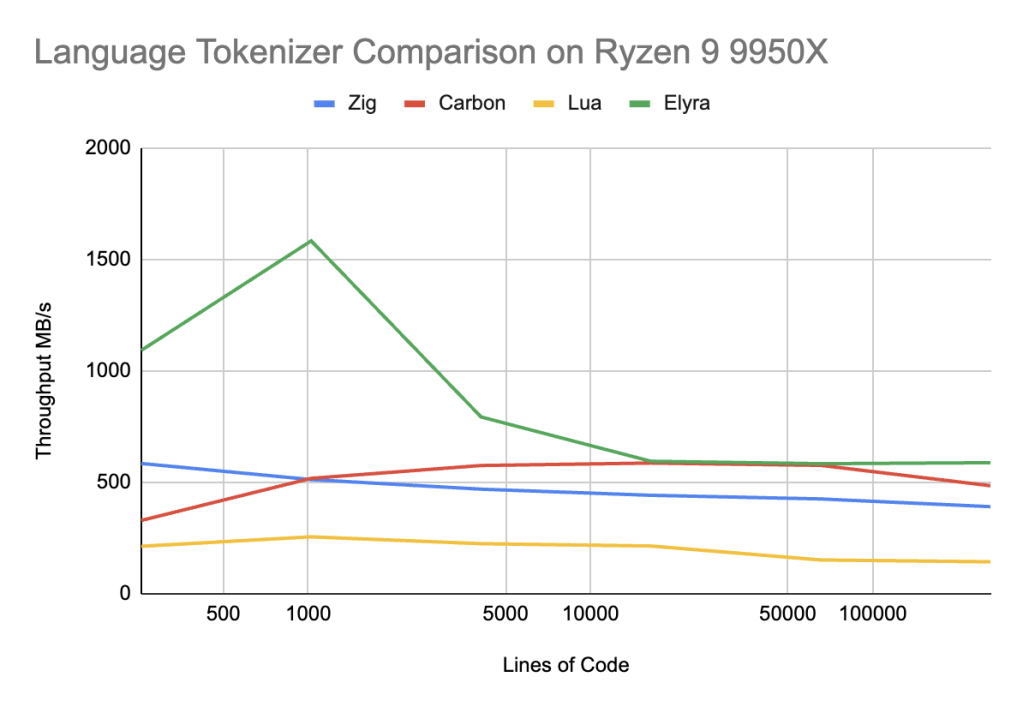
Elyra successful beats Lua by a wide margin, up to 3-4X faster, but to be completely honest, that is not entirely a surprising result — Lua is not attempting to be fast. To compare to languages whose goal is optimized compilation speed, maybe we get a better result.

On x86 in the 256-4096 lines of code range, Elyra beats Carbon by a factor of 50-200%, which is an amazing win, and trades blows evenly with the rest of the line ranges for Google Carbon. Elyra also outperforms Zig by 75-200% in the 256-4096 lines of code range and ~25% in the remainder of the range.

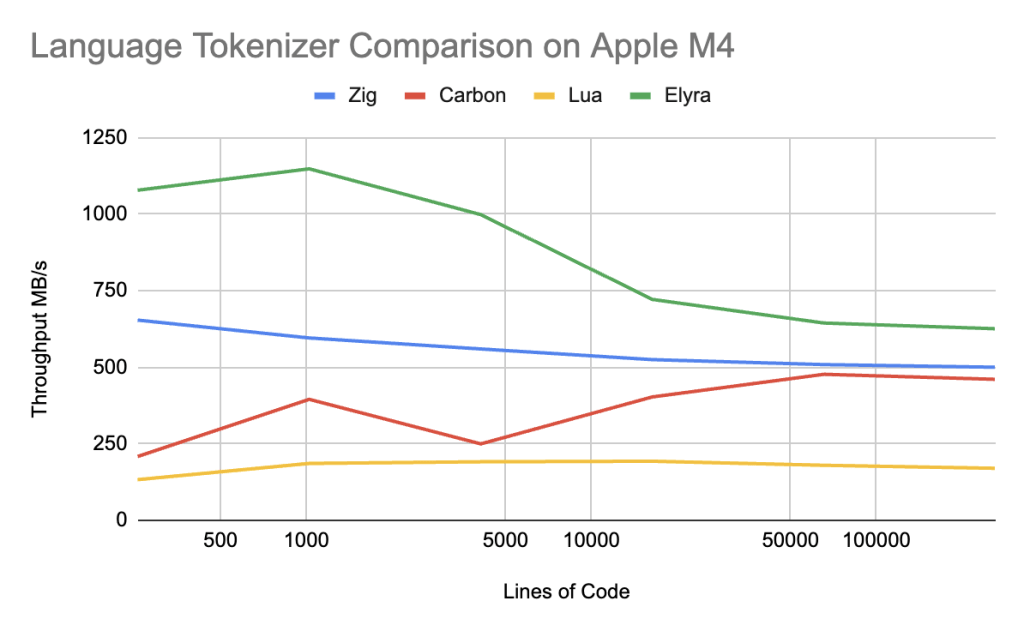
On Apple Silicon, Elyra handily wins over Carbon by 35-400% across ALL ranges. Elyra still beats Zig but only by 100% in the 256-4096 lines of code range and again ~25% in the remainder of the range.

Performance conclusions about Carbon seem to indicate there is a issue in the L1-L2 cache range that is only sorted out in the L3 cache range. Carbon and Zig are slightly more complex tokenizers, but Zig outperforms Carbon easily, indicating that Carbon has unique issues to its Tokenization strategy. I think the most likely issue is that the tail recursive dispatch tables are completely unpredictable and that a state machine like Zig, or Elyra’s simple “if” branches cause better branch predictor behavior, resulting in better speculative execution on x86 and Apple Silicon.

Of course now it becomes time to parse the grammar, and make sure we don’t lose any edges when it comes to that… which we’ll see in Part 2!

[OLD] Elyra: Building A Programming Language (Pt. 3)

Now that we have a basic tokenizer, the next step in the compilation process is parsing into the Abstract Syntax Tree! This is one of the harder areas of the compilation, especially if you’ve never written a parser before. I would strongly recommend reading about recursive descent parsing. Before we talk about the parsing process however, let’s look at the AST.

The Abstract Syntax Tree

The first thing to realize about the abstract syntax tree is that it is simply a cluster of Nodes. Each Node may or may not point to other nodes. It’s fairly easy to represent the AST as a collection of Polymorphic nodes that inherit from the base ASTNode.

struct ASTNode {
        virtual ~ASTNode() = default;
        static auto parse(TokenIterator &it) -> std::unique_ptr<ASTNode>;
        virtual auto codegen() -> Value * = 0;
};

This structure defines our ASTNodes as a base class with two methods, parse, and codegen(). The parse() method will take in an iterator over the Tokens and return a unique pointer to a Node. The codegen() method will output some functional value (LLVM’s Intermediate Representation Values) that we can use to piece together our code.

For example, a Function is composed of two nodes, a Prototype (which needs to generate its own IR) and a Body, which is a block of ASTNodes.

struct FunctionASTNode : public ASTNode {
        std::unique_ptr<PrototypeASTNode> proto;
        std::unique_ptr<BlockASTNode> body;
        FunctionASTNode(std::unique_ptr<PrototypeASTNode> proto,
                        std::unique_ptr<BlockASTNode> body)
                : proto(std::move(proto))
                , body(std::move(body))
        {
        }

        static auto parse(TokenIterator &it) -> std::unique_ptr<ASTNode>;
        auto codegen() -> Value * override;
};

Parsing

By implementing this format, we make the creation of a parser pretty much trivial from the standpoint of actually running “parse”. We just need to define a list of ASTNodes (e.g. a module / program) and parse until we find an EOF token.

auto parseCodeModule(std::vector<Token> &tokens) -> std::unique_ptr<CodeModule> {
        auto module = std::make_unique<CodeModule>();
        auto it = tokens.begin();
        while (it != tokens.end()) {
                module->nodes.push_back(ASTNode::parse(it));
        }

        return module;
}

Now each ASTNode runs through a parse tree starting at the base ASTNode.

auto ASTNode::parse(TokenIterator &it) -> std::unique_ptr<ASTNode>
{
        switch (it->type) {
        case TokenType::Extern:
                return ForeignFunctionASTNode::parse(it);

        case TokenType::Fn:
                return FunctionASTNode::parse(it);

        case TokenType::Eof:
                it++;
                return nullptr;

        default:
                throw std::runtime_error("Unexpected token at " +
                                         std::to_string(it->line) + ":" +
                                         std::to_string(it->column));
        }
}

Each individual ASTNode has a more detailed parse function depending on what was found. For example foreign functions defined by extern fn name(arg: type) rtype; will call a helper method called expect that throws an error and position if a syntactic violation has been committed.

auto expect(TokenIterator &it, TokenType type) -> void
{
        if (it->type != type) {
                throw std::runtime_error("Expected '" + getTokenName(type) +
                                         "' at " + std::to_string(it->line) +
                                         ":" + std::to_string(it->column));
        }
}

auto ForeignFunctionASTNode::parse(elyra::TokenIterator &it) -> std::unique_ptr<ASTNode>
{
        expect(it, TokenType::Extern); // EXTERN
        it++;

        expect(it, TokenType::Fn); // FN
        it++;

        //...
}

This greatly simplifies the parsing process and this is the basis of how recursive descent parsers tend to work. One of the best parts is that you can make very specific errors to be helpful to the user such as Error: Expected '{' at 7:23. These errors will get a bit more difficult in semantic analysis, but at our current stage let’s not worry about that.

Most of the parsing is a bit straight-forward — you’re just trying to fill structures with relevant data and parsing the syntax of the language. I think the most complex area is the code handling binary expressions. Right now we’re only implementing Add and Sub so this doesn’t handle order of operations just yet — but ExprASTNode was extremely difficult to get just right. I can only imagine adding order of operations, explicit parentheses, and more to become even more difficult.

auto ExprASTNode::parse(TokenIterator &it) -> std::unique_ptr<ASTNode>
{
        std::unique_ptr<ASTNode> lhs;

        if(it->type == TokenType::Number) {
                lhs = std::make_unique<NumberASTNode>(std::stoi(it->value));
                it++;
        } else if(it->type == TokenType::Ident) {
                if((it + 1)->type == TokenType::LParen) {
                        lhs = CallASTNode::parse(it);
                } else {
                        lhs = std::make_unique<VariableASTNode>(it->value);
                        it++;
                }
        } else {
                throw std::runtime_error("Unexpected token at " +
                                         std::to_string(it->line) + ":" +
                                         std::to_string(it->column));
        }

        while(it->type == TokenType::Add || it->type == TokenType::Sub) {
                TokenType op = it->type;
                it++;

                std::unique_ptr<ASTNode> rhs;

                if(it->type == TokenType::Number) {
                        rhs = std::make_unique<NumberASTNode>(std::stoi(it->value));
                        it++;
                } else if(it->type == TokenType::Ident) {
                        if((it + 1)->type == TokenType::LParen) {
                                rhs = CallASTNode::parse(it);
                        } else {
                                rhs = std::make_unique<VariableASTNode>(it->value);
                                it++;
                        }
                } else {
                        throw std::runtime_error("Unexpected token at " +
                                                 std::to_string(it->line) + ":" +
                                                 std::to_string(it->column));
                }

                lhs = std::make_unique<BinaryExprASTNode>(op, std::move(lhs), std::move(rhs));
        }

        return lhs;
}

This code is a bit hard to digest and could probably use some degree of abstraction — however the concept is finding a number, variable, or function call and checking the next element to see if it’s a binary operator. If it is, the next section is parsed as the right hand side of the equation. The equation is then combined into a BinaryExprASTNode and then reassigned as the left hand side and checked again to see if there’s any chaining going on. This then allows us to infinitely chain expressions (until you blow up the stack, but that seems unlikely). And at the very end it returns our expression.

Codegen

For now we’re going to export the LLVM context stuff to global space. We’ll create a method for initialization and define the constants.

llvm::LLVMContext context;
llvm::IRBuilder<> builder(context);
std::unique_ptr<llvm::Module> module;
std::unique_ptr<llvm::legacy::FunctionPassManager> fpm;
std::unordered_map<std::string, llvm::Value *> namedValues;

namespace elyra
{

void initContext()
{
        module = std::make_unique<llvm::Module>("elyra", context);
        fpm = std::make_unique<llvm::legacy::FunctionPassManager>(module.get());
        fpm->add(llvm::createInstructionCombiningPass());
        fpm->add(llvm::createReassociatePass());
        fpm->add(llvm::createGVNPass());
        fpm->add(llvm::createCFGSimplificationPass());
        fpm->doInitialization();
}
}

Let’s overview the context. First we need the global LLVM context. The IRBuilder needs to know the context. We then need to create a module and pass manager, alongside of a list of currently named values. This will probably need to be replaced with a Symbol Table in the future to understand and analyze code.

Each individual method then needs to call into the IRBuilder in order to build the LLVM IR.

For example here’s how PrototypeASTNode generates a function signature

auto PrototypeASTNode::codegen() -> llvm::Value *
{
        std::vector<llvm::Type *> argTypes(args.size());
        for (unsigned i = 0; i < args.size(); ++i)
                argTypes[i] = getType(args[i].second);

        llvm::FunctionType *FT = llvm::FunctionType::get(getType(returnType), argTypes, false);
        llvm::Function *F = llvm::Function::Create(
                FT, llvm::Function::ExternalLinkage, name, module.get());

        unsigned Idx = 0;
        for (auto &Arg : F->args())
                Arg.setName(args[Idx++].first);

        return F;
}

We first create an array of types and get the type information for each individual input type in the prototype arguments. After this stage we grab the return type and pass in the argument types to llvm::FunctionType::get() The last argument is if the function is variadic. The next is the creation of the Function Type — which in this case is Externally Linked. This is opposed to InternalLinkage which can allow some optimizations and inlining. Externally Linked code follows the C ABI, which allows us to link our toy language into C programs. The next part then goes through the function arguments and sets the names of variables. It’s not required but nice to have.

After we have a prototype, we can then generate the actual definitions. This consists of grabbing the prototype and then creating a Basic Block in the function with a label.

auto FunctionASTNode::codegen() -> llvm::Value *
{
        llvm::Function *function = module->getFunction(proto->name);

        if (!function) {
                function = static_cast<llvm::Function *>(proto->codegen());
        }

        if (!function) {
                return nullptr;
        }

        llvm::BasicBlock *BB =
                llvm::BasicBlock::Create(context, "entry", function);
        builder.SetInsertPoint(BB);
        namedValues.clear();

        for (auto &Arg : function->args()) {
                namedValues[Arg.getName().data()] = &Arg;
        }

        for (auto &node : body->body) {
                if (auto *expr = node.get()) {
                        expr->codegen();
                }
        }

        llvm::verifyFunction(*function);
        return function;
}

This method creates a function, inserts the named values and then calls codegen inside the Block. Then we call llvm::verifyFunction to find any errors in the IR code.

Once all code generation is done we can export the object file and compile to an output file using the code below.

auto outputObjectFile() -> void
{
        llvm::InitializeAllTargetInfos();
        llvm::InitializeAllTargets();
        llvm::InitializeAllTargetMCs();
        llvm::InitializeAllAsmParsers();
        llvm::InitializeAllAsmPrinters();

        auto targetTriple = llvm::sys::getDefaultTargetTriple();
        module->setTargetTriple(targetTriple);

        std::string Error;
        auto Target = llvm::TargetRegistry::lookupTarget(targetTriple, Error);

        if (!Target) {
                llvm::errs() << Error;
                return;
        }

        auto CPU = "generic";
        auto Features = "";

        llvm::TargetOptions opt;
        auto RM = std::optional<llvm::Reloc::Model>();
        auto TheTargetMachine = Target->createTargetMachine(targetTriple, CPU,
                                                            Features, opt, RM);

        module->setDataLayout(TheTargetMachine->createDataLayout());

        auto Filename = "output.o";
        std::error_code EC;
        llvm::raw_fd_ostream dest(Filename, EC, llvm::sys::fs::OF_None);

        if (EC) {
                llvm::errs() << "Could not open file: " << EC.message();
                return;
        }

        llvm::legacy::PassManager pass;
        auto FileType = llvm::CGFT_ObjectFile;

        if (TheTargetMachine->addPassesToEmitFile(pass, dest, nullptr,
                                                  FileType)) {
                llvm::errs()
                        << "TheTargetMachine can't emit a file of this type";
                return;
        }

        pass.run(*module);
        dest.flush();

        auto ret = system("clang output.o -o output");
        if(ret != 0) {
                llvm::errs() << "Failed to link object file\n";
                return;
        }

        delete TheTargetMachine;
}

Once this is done, we can make a program, compile it, and run it.
Here’s the test program:

extern fn putchar(i: i32) void;

fn main() void {
        putchar(72);
        putchar(105);
        putchar(33);
        putchar(10);
        return 0;
}

And there we go!

[OLD] Elyra: Building A Programming Language (Pt. 2)

In the last post, I described the basic idea for the programming language and ideas I had. This post will start actually writing some code. Mostly covering the Lexer/Tokenizer. However in order to begin the development process of making a programming language we have to discuss a few quick things about how it’s going to be built and compiler design in the most overarching sense. Those experienced or knowledgeable in the field probably can skip the explanation.

What does the compiler do?

From a bird’s eye view, what a compiler does to take a code file and compile it into binary form is rather simple. You first take the file, read it into memory, and then split up the tokens of the language (this is stuff like int or ; and identifiers and literals). This first step is called “tokenization”, “lexing”, or “lexical analysis” (use this to sound smart). The next part is to then take this list of tokens and then parse it into an abstract syntax tree. This means enforcing the language grammar — this is where a lot of the syntax errors will probably be found, especially that missing ; on line 45. The parser parses into more abstract concepts like “Expression”, “Prototype”, “Function Definition” and other ideas.

From this step there can be additional passes to check things at compile time like not allowing you to use an uninitialized variable and enforcing a static type system. This is called “semantic analysis”. Once this analysis is done, you can hop into code generation — which usually emits some sort of intermediary representation of your code. For GCC this is GIMPLE and for LLVM this is their IR and MLIR. We will be using LLVM because it is open source and a highly performant and multiplatform compiler backend.

Once you generate this IR code there are many passes that can be ran over this code in LLVM like optimization passes and emitting formats. You can also run the LLVM JIT Compiler at this stage and call it a day if you really want to. Past this phase we emit an object file (.o) which tries to parse an object file, resolve missing names (function/data resolution), and finally emits a binary file which you can run.

Starting Lexical Analysis

Obviously I can’t cover all this in a single article — that’d be a bit absurd. We’re just gonna look at lexing for now and a sample file. So let’s make a brief language sample.

fn add(a: i32, b: i32) -> i32 {
        return a+b;
}

fn main() -> void {
        return add(1, 2);
}

Since we’re going to use LLVM for compiling, I’m going to have to write the compiler in C++(!). Currently I’m using Zig as the build system as it is a drop-in C and C++ compiler. I’ve named the language “Elyra” after the constellation “Lyra” which is a name referencing the “Lyre” a musical instrument like a harp. The name Lyra references beauty, harmony, and artistic expression. It’s called Elyra because the name Lyra is taken by an academic paper.

For our C++ program, I’m going to skip the details of “main” and setting up the code for now — it’s pretty much a generic console program. The first interesting structure to define is what is a token?

What is a Token?

The token for me has two main purposes, it has to have a Type and Value. The Type indicates if it’s a keyword or special character. The value holds the actual value for things like identifiers, numbers, and more. Beyond this basic functionality a Token should probably have useful metadata like the line number and column. This is helpful for syntax errors being able to point to the exact area of an issue!

struct Token {
        TokenType type;

        std::string value;
        Type valueType;

        size_t line, column;
};

Of course you’ll notice here I’ve used std::string for the value. For now that’s okay because we can just parse out a string into numbers. The valueType field holds any type data for the Type token. These are the types I discussed in the previous article. The other type I used is TokenType which is an enum defined here:

enum class TokenType {
        Fn,
        Pub,
        Type, // any of u8, i8, f32, bool, etc.

        Ident,
        StringLiteral,

        LParen,
        RParen,

        LSquirly, // {
        RSquirly, // }

        Semicolon,
        Colon,
        Comma,

        Add,
        Sub,
        Mul,
        Div,

        RTArrow, // Return type arrow

        Eof // Special
};

This enumeration holds every piece of data required for the program we described earlier. To actually tokenize this we’re going to create a class called Lexer which contains methods to parse a file into tokens.

The Lexer

class Lexer final {
    private:
        size_t line, column;
        std::string current_token;
        std::vector<Token> &tokens;

        auto add_token_default() -> void;
        auto check_special_tokens(char c, size_t &i, const std::string &buffer)
                -> bool;
        auto check_string_literal(char c, size_t &i, const std::string &buffer)
                -> bool;

        auto filter_keyword(Token &tok) -> void;

    public:
        Lexer(std::vector<Token> &tokens);
        ~Lexer() = default;

        auto lex_file(const std::string &path) -> void;
        auto lex(const std::string &buffer) -> void;
};

The internal state of Lexer simply keeps track of the current token, line, column, and a reference to a vector of Tokens. A Lexer does not own the Token list. It has simple methods to add a default token (which is just an identifier), checking for special character tokens, string literals, and filtering keywords out of identifiers.

lex_file isn’t that interesting of a method — it just loads a whole file into a string and throws it to the main lex method.

auto Lexer::lex(const std::string &buffer) -> void
{
        for (size_t i = 0; i < buffer.length(); i++) {
                auto c = buffer[i];

                if (c == '\n') {
                        add_token_default();
                        line++;
                        column = 1;
                } else if (c == ' ') {
                        add_token_default();
                        column++;
                } else if (c == '\t') {
                        add_token_default();
                        column += 4;
                } else {
                        if (check_special_tokens(c, i, buffer))
                                continue;

                        if (check_string_literal(c, i, buffer))
                                continue;

                        current_token += c;
                        column++;
                }
        }

        add_token_default();

        tokens.push_back(
                Token{ TokenType::Eof, "", Type::void_, line, column });

        for (auto &token : tokens) {
                filter_keyword(token);
        }
}

The lex method is pretty digestible — it iterates over the buffer and pulls out the current character. If the character is new line, space, or tab, it updates the line / column metadata, and attempts to add a token. Otherwise we check if there’s any special tokens or string literals. If there are any, these methods automatically add them. Otherwise we’ll just add the current character to the token buffer and increase the column count. After the method finishes we just make sure to add a token if any exists and push the end of file token. We then filter our identifiers into keyword and type tokens.

Of course let’s have a look at how we’re grabbing the actual tokens in add_token_default:

auto Lexer::add_token_default() -> void
{
        if (current_token == "")
                return;

        tokens.push_back(Token{ TokenType::Ident, current_token, Type::void_,
                                line, column - current_token.length() });
        current_token = "";
}

This block isn’t that difficult — all we do is check if the current_token has a value, then push back an identifier with the current token. Importantly we subtract the token length from the column so it always points to the beginning. After this we consume the current_token and set it to empty. (Perhaps .clear() is better — not really sure the performance difference)

The check_special_token method is literally a switch case with a case for each special character. The only notable exception is - which also needs to check for the return arrow ->

        case '+': {
                add_token_default();
                tokens.push_back(Token{ TokenType::Add, "+", Type::void_, line,
                                        column++ });
                return true;
        }
        case '-': {
                add_token_default();
                if (buffer[i + 1] == '>') {
                        tokens.push_back(Token{ TokenType::RTArrow, "->",
                                                Type::void_, line, column });
                        i++;
                        column += 2;
                        return true;
                } else {
                        tokens.push_back(Token{ TokenType::Sub, "-",
                                                Type::void_, line, column++ });
                        return true;
                }
        }

We’ll ignore check_string_literal because it’s not useful for this sample. The method in general is to find a " character and then continue reading until you find the ending " or erroring if you find a '\n' before the end of the string literal (indicating a run-on string). The next method that’s important to understand is filter_keyword which sorts through tokens and if it finds an identifier (our default token type) checks it and sorts it into keywords or value types.

auto Lexer::filter_keyword(Token &tok) -> void
{
        if (tok.type != TokenType::Ident)
                return;

        std::unordered_map<std::string, TokenType> baseKeyword = {
                { "fn", TokenType::Fn }, { "pub", TokenType::Pub }
        };

        if (baseKeyword.find(tok.value) != baseKeyword.end()) {
                tok.type = baseKeyword[tok.value];
                return;
        }

        // clang-format off
        std::unordered_map<std::string, Type> vtypeKeyword = {
                { "u8", Type::u8 },
                { "u16", Type::u16 },
                //...
        };
        // clang-format on

        if (vtypeKeyword.find(tok.value) != vtypeKeyword.end()) {
                tok.type = TokenType::VType;
                tok.valueType = vtypeKeyword[tok.value];
                return;
        }
}

Here we first check if it’s an Identifier. If it’s not we do not care. Then we check the list of keywords which is just an unordered_map. Unordered map was chosen because it performs better in string searches and order of the map is not important here. If it’s found it sets the keyword value otherwise it checks if there’s a value type keyword.

Finally I made a method to print out the tokens by line and column numbers, the value of the token, and then the type. If the token is a type then the type number is replaced with an annotation that it is a type and gives the type value.

Here’s the program in action!

That’s it for now…

I’ll be continuing to work on Elyra into the future and cover parsing and the abstract syntax tree in part 3.

[OLD] Elyra: Building A Programming Language (Pt. 1)

Well — how should I go about it? It’s probably a question that people ask themselves, get stuck on, and give up. Not to mention the complexity of making a lexer, analyzing syntax and parsing into an AST, semantic analysis, code generation, linking or interpreting. There’s way too much to think about, however I believe a language is doomed to fail if there isn’t some idea of what you want to do.

My first thoughts are of course what do I want to do? In my case I want something with a familiar syntax that operates as a safe(r) and simpler alternative to C++. I’ve read a lot into Zig and Rust, and I really love Zig. This language will be sort of a love letter while incorporating classes. I considered making a C++ transpiler, and maybe that’ll be for another day, but I’d really like to get into LLVM.

So with the broadest possible context I just described, I need to make a basic idea of what I want to do. So let’s go section by section down a hypothetical language with a sample at the end.

Variables

I admire Rust’s philosophy on variable mutability — however I like the syntax of Zig. In my opinion const and var communicates slightly better that a variable is mutable than let and let mut.

Data Types are pretty simple in my opinion. C (and by extension C++’s) type system sucks! What is an int anyways? The only things I really like is size_t which is also represented in Rust and Zig as usize and isize. Beyond this I find the u8, u16, u32, i8, i16, i32 convention to be very easy to understand.

As a subnote Zig has arbitrary bit lengths (e.g. u53) which I find to not be a particularly fine feature — I’d like something like u1, u2, u4 as the middle ground so that you can be more specific on what you’re looking for when manipulating subsections of a byte.

Beyond these base types I think a few other primitive types should exist like void (specifically for functions) and bool for boolean logic, and opaque (essentially void*). Maybe instead of opaque the keyword any could be used — this is pretty arbitrary to change.

Pointers

Pointers will probably use the canonical * as marking the pointer, and it should precede the type in my opinion. So for example *u8 is a pointer to arbitrary bytes. Zig has a feature where there’s *u8 is a singular and [*]u8 refers to multiple. I have no strong opinions on this distinction, but overall I like just using a pointer as a C pointer.

Should pointers be able to be null? No! Any pointer must either be undefined (not yet initialized) or set to a value. If you need nullable pointers, then that should be the role of optionals!

Also I appreciate Zig’s .* syntax because it sure beats *data = 10 and being able to reference structures without using the -> operator is not fun!

Another related concept is slices. I really like Zig’s slice type. If you’re not familiar it’s basically

// In C++
struct Slice<T> {
    T* data;
    size_t len;
};

// In Zig
const Slice = struct {
    data: [*]T,
    len: usize
};

And the syntax is []u8 where this is a slice. Arrays are required to have a size. Slices make no assumptions about the data they point to — a slice may or may not have ownership of the data it references. If the slice is not constant then it may modify the data. It has range syntax as well with 0.. to the end of a slice and 0..3 to be the range [0, 1, 2]. This generates a new slice. Additionally 0...3 refers to the inclusive range [0, 1, 2, 3]

Optionals/Errors

Optionals are a great feature of languages. I really like the way it looks and operates in Swift. An optional is just a ? that you put at the end of a type and allows the ability to set the value to nil. Functionally this type allows us to know whether or not something is set to a value. This is very useful for pointers where maybe you’re calling some function allocate and it fails — you are required to check whether or not this succeeds using the ? operator.

var my_ptr: *u32? = allocate(sizeof(u32));
my_ptr?.* = 25;

if my_ptr |ptr|
{
    ptr.* = 30;
}

var option_value: i64? = nil;

if option_value? == 20 
{
    do_something();
}

You’ll note the capture block in the if-statement. This allows you to discard the ?

I also like Zig’s error handling system using the ! type. This allows you to have errors. One thing I dislike about this however is the error unions — at least in the way that the compiler implements it and the anyerror type. I think that errors should probably just be a structure like so:

struct Error {
     size_t kind = 0x1;
};

The total set of errors can be calculated by the compiler and then you just need to handle the specific kinds by doing some type of match expression or just generically handling it.

So any function that may fail must mark itself as possibly throwing an error. To “throw” an error the error is returned as part of the return type. The try block without a catch is equivalent to try x() catch |e| { return e; }

Functions

Functions have the same general syntax of [pub] fn where pub is optionally public. Functions have a name and parameters (arguments) that are passed in like so pub fn main(argc: i32, argv: *[]const u8) -> i32 The return syntax is the same as Rust and the returns are optionally compiler-inferred.

The arguments to a function of base types like i32 or *u8 are not modifiable. In the case of pointers however the pointer can be dereferenced and modify unless marked *const u8 User defined types are passed by reference, so any modifications made to them are kept unless marked const.

Comments

// is simple enough. Maybe /// for documentation.

Objects, Interfaces, and Inheritance

Time to be controversial. I don’t think OOP/Inheritance is necessarily bad. I think it’s definitely overused and I want to implement very simple principles. I think the functional difference between a struct and a class is default visibility, much like C++. In both cases, struct and class are considered objects and are able to inherit from a parent. Interfaces are abstract-only layouts of objects and can be applied.

Class members are static unless they define an argument this: self. self is just a reference to the current class. And instead of using this you can use .member_var (an idea borrowed from Jakt).

const Foo = class {
    x: u32,
    pub z : u32 {set},

    Foo() {
        .x = 0;
    }

    pub fn bar() {
        print("Bar!");
    }

    pub fn add(this: self, y: u32) -> void {
        .x += y;
    }
}

This has a peculiarity with public variables. You can set public variables as get or set — which automatically checks the access to the variable. If you don’t define this block it’s get + set by default. Beyond this the code is pretty straight forward. X cannot be set without the this definition in the add code. One would call foo.add(10) as it’s an instance method but Foo::bar()

Interfaces are pretty much objects but all functions are assumed virtual unless defined. All interfaces and objects can inherit one other object. Overrides exist for overriding inherited functions. However overloads are not present. To refer to the base class (inherited from) you can use base.method().

const Foo = interface {
    x: u32

    pub fn plus_one(this: self) {
        .x += 1;
    }

    pub fn plus(this: self) {
        .x += 2;
    }
}

const Bar = class from Foo {
    override fn plus(this: self) {
        .x += 3;
    }
}

The from syntax is in reference to the concept class A derived from B. Override comes before the function in the logic. The access specifier doesn’t need to be repeated here because it’s inherited from the parent.

Enum & Match

All enums should have a backing type that it can be effortlessly converted between via a keyword like as. Enums may have values assigned — enums need to be backed by integer types. Enums may be used as literals with just the .value of the actual tag.

const Color = enum(u8) {
    Red = 0,
    Green,
    Blue = 23
};

var color = get_color();
if color == Color.Red or color == .Red
{
    do_something();
}

Match is a drop-in for switch statements. And uses the => syntax from Rust and Zig.

match color 
{
    .Red => { do_something(); },
    _ => { return Error.NotRed; }
}

Control Flow

I’ve been using if throughout the article and it’s pretty clear – the parentheses are entirely optional and the && || is replaced with the word and or. Additionally captures exist for the optional or error type.

for loops like in zig loop over a slice or array and has a capture value for the index and the value. while loops are like traditional C while loops. Infinite loops have a loop syntax.

var bytes: []u8;

for bytes |*value, index| 
{
    value.* = index;
}

while condition 
{
   if other_condition
       break;
   else 
       continue;
}

var x : i32 = 0;
loop 
{
   x += 1;
}

For Now…

That’s it for now. I’m sure I’ve overlooked something. But I’ve spent my time building up the idea and can’t think up too much more. It’s finally time to get into the interesting stuff… code!

CrossCraft’s Indev Terrain Generator Part 2

Generating floating worlds is by contrast to 2D worlds incredibly different. We will still need to use heightmaps in some places, but the actual terrain body is made up of 3D perlin noise. If you’re familiar, usually you see perlin noise as a two dimensional image by which you create a heightmap. In this case, we have a 3D perlin noise as a density map. This is a little bit hard to explain but areas with a higher values at their XYZ coordinates become “solid” and those with lower values at their XYZ coordinates are air.

This can actually be applied as a negative mask to a 2D world to generate caves. This is in part how the amazing caves from the newer Minecraft updates work (1.18+). Classical style caves are made with Perlin worms cutting oblate spheroids into the world, as explained in the previous article about Perlin worms.

for(int y = 0; y < map->height; y++) {
    for (int z = 0; z < map->width; z++) {
        for (int x = 0; x < map->length; x++) {
            uint32_t index = (y * map->length * map->width) + (z * map->width) + x;

            densityMap[index] = (noise3d(x, y, z) + 1.0f) / 2.0f;

            if(densityMap[index] > 0.67f) {
                SetBlockInMap(map, x, y, z, 1);
            }
        }
    }
}

This basic function iterates over every block and generates a density value. If this is above our threshold (0.67) then it is solid. Otherwise, it is empty. This is then reflected by placing stone into the map. Next, we’re going to generate TWO heightmaps. One is for the bottom, and another is for the top.

    for (int z = 0; z < map->width; z++) {
        for (int x = 0; x < map->length; x++) {
            for(int y = map->height - 1; y >= 0; y--) {
                uint8_t blk = GetBlockFromMap(map, x, y, z);

                if(blk != 0){
                    heightMap[x + z * map->length] = y;
                    break;
                }
            }
        }
    }

    for (int z = 0; z < map->width; z++) {
        for (int x = 0; x < map->length; x++) {
            for(int y = 0; y < map->height; y++) {
                uint8_t blk = GetBlockFromMap(map, x, y, z);

                if(blk != 0){
                    heightMap2[x + z * map->length] = y;
                    break;
                }
            }
        }
    }

The first heightmap marches from the top of the map down to the bottom to generate a “traditional” heightmap view. This will be used for generating stuff like plants, strata, and the surface. The second one is from the bottom up and finds the lowest values of the islands. This is used in strata generation in order to limit some generation artifacts that occur otherwise.

    create_strata2(map, heightMap, heightMap2);
    create_surface(map, heightMap);

    create_ores(map);

    create_plants(map, heightMap, 1);

So now, this code generates the strata in a slightly different way to the original strata function outlined. The create surface, ores, and plants all happily work in this code though!

void create_strata2(LevelMap* map, const int16_t* heightmap, const int16_t* heightmap2) {
for(uint16_t x = 0; x < map->length; x++){
for(uint16_t z = 0; z < map->width; z++){
float dirt_thickness = octave_noise(8, x, z, 0) / 24.0f - 4.0f;
int dirt_transition = heightmap[x + z * map->length];
if(dirt_transition >= 63 || dirt_transition <= 0)
continue;

int stone_transition = dirt_transition + dirt_thickness;

int start = heightmap2[x + z * map->length];

for (int y = dirt_transition; y >= start; y--) {
int block_type = 0;

if (y <= stone_transition) {
block_type = 1;
} else if (y <= dirt_transition) {
block_type = 3;
}

if(GetBlockFromMap(map, x, y, z) == 0)
break;

SetBlockInMap(map, x, y, z, block_type);
}
}
}
}

The create strata method is modified here to use the starting point and avoid iterating across empty space. The main highlight here is also the air check present in this method. The air check prevents us from continuing to the bottom of the void which can occur and generates UGLY islands.

Everything else is basically the same as the regular create_strata methods.

Remember to free your variables, and you’re set! You now have floating islands and actually a method to carve caves into the map too!

CrossCraft’s Indev Terrain Generator Part 1

CrossCraft Indev attempts to implement similar terrain generation to Minecraft Indev through the use of the original classic generator, modified to make the world more interesting. Minecraft Indev has several profiles which we attempt to replicate. There’s Original, Flat, Forest, Island, Floating, Paradise, and more. We implement Original, Flat, Forest, Island, and Floating.

The original Minecraft Classic terrain generator is well documented by UnknownShadow200 on the wiki for ClassiCube. This is a nice pseudocode layout, which we implement in the terrain generator for CrossCraft Indev.

Based on this documentation we have the following methods:

//Create height-map, "Raising..."
void create_heightmap(int16_t* heightmap, uint16_t length, uint16_t width);

//Smooth out height-map, "Eroding..."
void smooth_heightmap(int16_t* heightmap, uint16_t length, uint16_t width);

//Create strata, "Soiling..."
void create_strata(LevelMap* map, const int16_t* heightmap);

//Carve out caves, "Carving..."
void create_caves(LevelMap* map);

//Create ore veins
void create_ores(LevelMap* map);

//Flood fill-water, "Watering..."
void flood_fill_water(LevelMap* map);

//Flood fill-lava, "Melting..."
void flood_fill_lava(LevelMap* map);

//Create surface layer, "Growing..."
void create_surface(LevelMap* map, int16_t* heightmap);

//Create plants, "Planting..."
void create_plants(LevelMap* map, int16_t* heightmap, int off);

These methods are used across the entire terrain generator, so check out the total source code for our terrain generator here to see how we’ve implemented these methods. Our notable modifications to the “original” is a slight increase to the number of trees from the pseudocode, a decrease to the number of caves (our caves were too long), and amplification boost to the terrain, which helps to generate the terrain we receive.

Beyond that, with a baseline generator, how do you derive these other ones? Well for one thing, we can definitely recreate a forest! Forest terrain simply requires us to use the `create_plants()` more than once. Two runs was what we found generated terrain with lots of trees and flowers while still allowing open meadows. For a full tree world, I’d recommend repeating the method a third time. Forests are perhaps the easiest of these to create.

For our flat terrain generator, we actually decided to do away with the heightmap creation, and then run a simple method to generate the strata before planting on top of it.

for(uint16_t x = 0; x < map->length; x++){
    for(uint16_t z = 0; z < map->width; z++){
        for (int y = 0; y < 64; y++) {
            int block_type = 0;

            if(y == 0 ){
                block_type = 7;
            } else if (y == 1) {
                block_type = rand() % 2 == 0 ? 7 : 1;
            } else if (y <= 28) {
                block_type = 1;
            } else if (y <= 31) {
                block_type = 3;
            } else if (y <= 32) {
                block_type = 2;
            }

            SetBlockInMap(map, x, y, z, block_type);
        }
    }
}

int16_t* tempHeightMap = calloc(sizeof(int16_t), map->length * map->width);
for(int i = 0; i < map->length * map->width; i++) {
    tempHeightMap[i] = 32;
}
create_plants(map, tempHeightMap, 0);
create_ores(map);
free(tempHeightMap);

This is also a pretty simple terrain generator where we go across the map and generate basic layered terrain, according to the Y Value. We then create a “fake” heightmap to make some plants in the map, which is necessary for the method. Creating the plants and ores and freeing the map we made is enough to have a fully populated flat world.

For the island heightmap, we have a more interesting conundrum. How do you generate an island in the center of the map? The simple answer is to multiply the heightmap by a mask function which traces a circle. Values closest to the center are then highest in the map, resulting in a roughly circular Island!

void CrossCraft_WorldGenerator_Generate_Island(LevelMap* map) {
    int16_t* heightMap = calloc(sizeof(int16_t), map->length * map->width);

    // Generate a heightmap
    CC_Internal_Log_Message(CC_LOG_INFO, "Raising...");
    create_heightmap(heightMap, map->length, map->width);

    // Smooth heightmap
    CC_Internal_Log_Message(CC_LOG_INFO, "Eroding...");
    smooth_heightmap(heightMap, map->length, map->width);

    // Smooth to make an island
    smooth_distance(heightMap, map->length, map->width);

    // ...
}

So to do this, we made a new method, smooth_distance, that takes in the heightmap and the dimensions of the map.

void smooth_distance(int16_t* heightmap, uint16_t length, uint16_t width) {
int midl = length / 2;
int midw = width / 2;

float maxDist = sqrtf(length * length + width * width) / 2;

for(int x = 0; x < length; x++){
for(int z = 0; z < width; z++) {

int diffX = midl - x;
int diffZ = midw - z;

float dist = sqrtf(diffX * diffX + diffZ * diffZ) / maxDist;

heightmap[x + z * length] = ((1-dist) + 0.2f) * (float)heightmap[x + z * length];
}
}
}

So the code is relatively simple. We first find the middle of the map on the XZ axis. We can also determine the maximum distance possible from the center which is just the distance from (0, 0) to (length, width) divided by 2. Then for each XZ, we can calculate the distance by taking the difference between any (x, z) pair and the center point. We then calculate the distance and normalize it to 1.0 by dividing by maximum distance.

To factor this into the heightmap, we index into the heightmap and we take 1 – distance. This is because we want the center to be populated, not the corners. Otherwise, you end up with some weird mountain corner map. We also added a static offset in order to simulate the base of the map. Realistically we should also have multiplied (1 – distance) by 0.8f then added 0.2f to make sure values always stay in the 0.0 – 1.0 range. However, the idea behind what we did was to make the center more of a “mountain”. Most islands in real life are created from a volcanic center which results in a similar topography.

In the next post, I’ll talk about the “Floating” Level Generator.

Perlin Worms

Perlin Worms

In the world of procedural generation, noise functions are ubiquitous and almost omnipresent. Perlin worms are a solution for those looking for river and cave generation in many of these procedural worlds. Perlin worms are actually an incredibly simple method to add realistic and winding caves and rivers. Yet for some reason, there’s a lack of explanation on the internet. And even less code to show it off

One of the best sources I found for this was actually a GDC talk which was archived called Math for Game Programmers: Digging with Perlin Worms. Squirrel Eiserloh takes about 30 minutes to go ahead and dive deep into the uses of noise and worms. He starts talking about Wandering Algorithms and Perlin Worms around the 10 minute mark.

Onto the coding process: How should we do this? The first step is determining where you want your worms to spawn. There’s way too many different places to find suitable locations – from min-max testing to throwing some numbers into rand() – I’ll let you choose. What’s important here is the creation and management of these worms

auto perlin_worm(float x, float y) -> void {
      auto worm_x = x;
      auto worm_y = y;

      float worm_dir = get_noise(worm_x, worm_y) * 360.0f;

      // MORE CODE LATER
}

The function fragment above is simply setting up some variables. The main line of interest is the worm_dir. worm_dir is a value in degrees (you can use radians as well if you want) that determines the direction the worm is facing. Here, we assume get_noise()’s result is normalized between 0.0 and 1.0. The next step will be to iterate forward and modify the direction.

// Iterate

const int MAX_STEPS = 64; //How many steps to iterate
const int STEP_SIZE = 5.0f; //How far to move the head
const int ANGLE_CHANGE = 120.0f; //Total change of +/- 60.0f

for(uint8_t step = 0; step < MAX_STEPS; step++) {
     //DO YOUR EFFECT

     worm_x += cosf(worm_dir) * STEP_SIZE;
     worm_y += sinf(worm_dir)  * STEP_SIZE;

     worm_dir += (get_noise(worm_x, worm_y) - 0.5f) * ANGLE_CHANGE;
}

This code iterates over the loop for MAX_STEPS number of times. The worm_x and worm_y are incremented by the direction. This can be multiplied by a scalar value STEP_SIZE to change how far the worm goes in a given direction. Finally, the worm’s direction is modified by plus or minus half of the ANGLE_CHANGE value. The effect is left up to the implementor. This could be clearing an area surrounding the worm, or maybe even a sphere?

In general, this is actually a very simple algorithm. You can customize the frequency of get_noise in order to vary how often a change is made and the angle in order to change how drastically these modifications affect it. You could even add multiple octaves of noise to get some very curvy rivers or caves.

In 3 dimensions, your step would be to take the vector direction, then rotate it on the relative cross vector and rotate it on the relative up vector in order to get a 3D transformation.

Hello.

This is the first ever post on my little blog here.

I’m Iridescence, or Nathan Bourgeois, a small little YouTuber working on some projects relating to homebrew and the Sony PSP. My channel is growing well and I’m looking to continue to work and develop in the homebrew scene as a passion. I also hope that I can help others and give them experiences they want to follow.

Why am I here?

  • Diversification is good.
  • I want to have more intimate updates with a blog.

I’ll be working on making some more technical and useful content here that adds a lot more useful information on the PSP and my projects specifically. There’s a lot to say, and it’s hard to get that all out on a video, so I’m going to use this place as my launchpad.

So for more technical minded readers, you all can learn a lot more from some of my struggles and the things I say here (hopefully). I might even post some basic code to show things off. However, this is far from a complete documentation nor should it be used as one. It’s just secondary source material which may show some stuff off.

Thank you, dear reader, for reading so far. I promise I’ll keep you updated.